 DocuAssist.AI Guide
Add an expiry date to a PDF
Give a PDF an expiry date, for example for a quote that is only valid for 30 days.
Add an expiry date
- In My Documents, select the PDF's row menu (⋯) → PDF Tools → Add Expiry Date.
- Choose 7 days, 2 weeks, 1 month, 6 months, 1 year or 2 years, or pick a date, time and time zone.
- Write the message people see after the date, for example "This quote has expired. Please ask us for a new one."
- Select Apply Expiry.
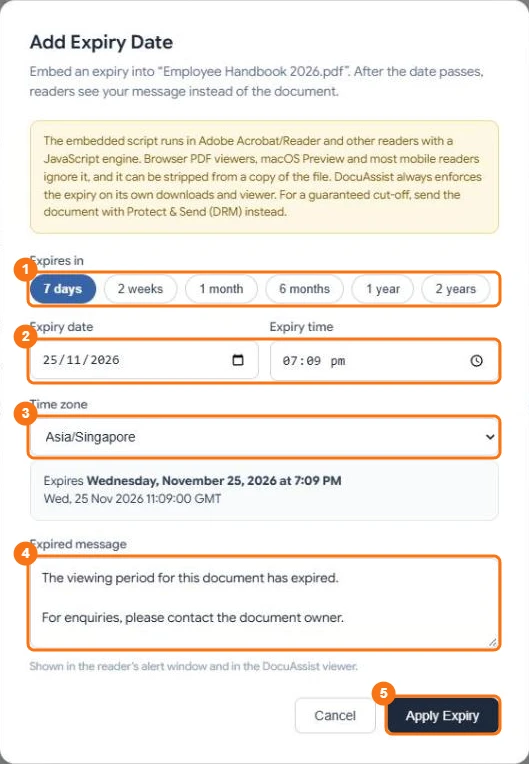
In the picture: 1 quick choices, 2 the date and time, 3 the time zone, 4 the message people see after the date, 5 Apply Expiry.
What happens after the date
- In DocuAssist.AI, the file can no longer be downloaded or edited, and opens with an "expired" notice. The workspace's owner and admins can still open it, so they can change or remove the date.
- In Adobe Acrobat and Acrobat Reader, a copy downloaded before the date shows your message and closes.
Warning
Outside DocuAssist.AI, the expiry date is a deterrent, not a lock: browsers, macOS Preview and most phone apps ignore it, and it relies on the reader's clock. To be sure access really ends, use Protect and Send.
Change or remove the date
Select PDF Tools → Change Expiry Date or Remove Expiry Date.
Good to know
Setting an expiry date uses 20 credits per document.
Related
Last updated on November 18, 2026